
Resizing the file system after volume expansion
When a volume attached to your virtual machine is resized, it may not automatically provide the additional storage capacity to the operating system. To fully utilize the expanded volume, you must resize the file system, which allows the OS to recognize and make use of the extra space. Follow the steps below for resizing the file system on Linux or Windows, depending on your virtual machine’s operating system.
For Linux Instances
- Log into the instance: Use SSH to access your Linux VM:
ssh -i <key_path/private_key_file> <username>@<public_IP>- Identify disk information: Use
dfcommand to list the size of the file system and to find the device names for your disks.
sudo df -Th Filesystem Type Size Used Avail Use% Mounted on
/dev/sda1 ext4 9.7G 1.2G 8.5G 12% /
/dev/sdb ext4 250G 60M 250G 1% /mnt/disks/disk-13. Resize the file system of the disk:
- For volumes formatted with
ext4, apply theresize2fscommand to increase the file system (replaceDEVICE-NAMEwith your disk’s name, found in the Filesystem column of thedfoutput):
sudo resize2fs /dev/DEVICE-NAMEThe filesystem on /dev/sdb is now 157286400 blocks long.- For volumes formatted with
xfs, apply thexfs_growfscommand to increase the file system (replaceMOUNT-DIRwith your disk’s mount point, found in the Mounted on column of thedfoutput):
sudo xfs_growfs MOUNT-DIRmeta-data=/dev/sda isize=512 agcount=4, agsize=32768000 blks
= sectsz=512 attr=2, projid32bit=1
= crc=1 finobt=1 spinodes=0
data = bsize=4096 blocks=131072000, imaxpct=25
= sunit=0 swidth=0 blks
naming =version 2 bsize=4096 ascii-ci=0 ftype=1
log =internal bsize=4096 blocks=64000, version=2
= sectsz=512 sunit=0 blks, lazy-count=1
realtime =none extsz=4096 blocks=0, rtextents=0
data blocks changed from 131072000 to 157286400- For volumes If you are using
btrfs, use thebtrfscommand (replaceMOUNT-DIRwith your disk’s mount point, found in the Mounted on column of thedfoutput):
sudo btrfs filesystem resize max MOUNT-DIRResize '/mnt' of 'max'- Verify resizing: Check the new size with
df -hto confirm.
df -h /dev/DEVICE-NAMEFor Windows Instances
-
Connect via RDP: Access your Windows VM using RDP
-
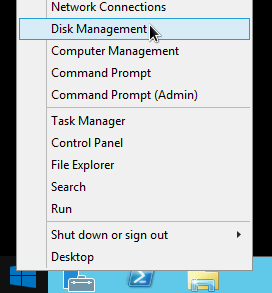
Open disk management: Right-click the Start button and select Disk Management
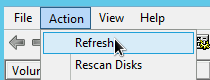
3. Refresh disk management: Click Action > Refresh at the top to recognize the new space.
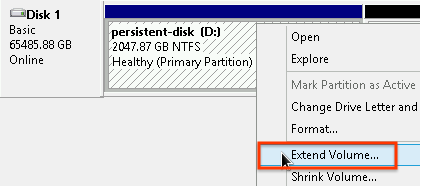
4. Extend volume: Find the disk that you’ve resized and right-click on it and select Extend Volume. Follow the Extend Volume Wizard instructions to extend the disk.
- Verify changes: After the volume finishes formatting, check the Status column in Disk Management to confirm that the disk is Healthy.
After these steps, the file system will be fully resized to utilize the expanded volume space.
Last updated on 16 Jan 2025