
Create Spot Instance
Overview
Users can use this page to create a Spot instance. There are three main steps in provisioning a compute instance:
- Configuration — Select a compute instance configuration.
- Settings — Select the network type, security group, operating system, and authentication method.
- Review and Apply — Choose the number of compute instances, then confirm and apply.
Step 1. Configuration
In the Configuration step, you define the technical parameters of the Spot instance. Use the filters on the left to narrow down available options. Matching configurations are displayed on the right.
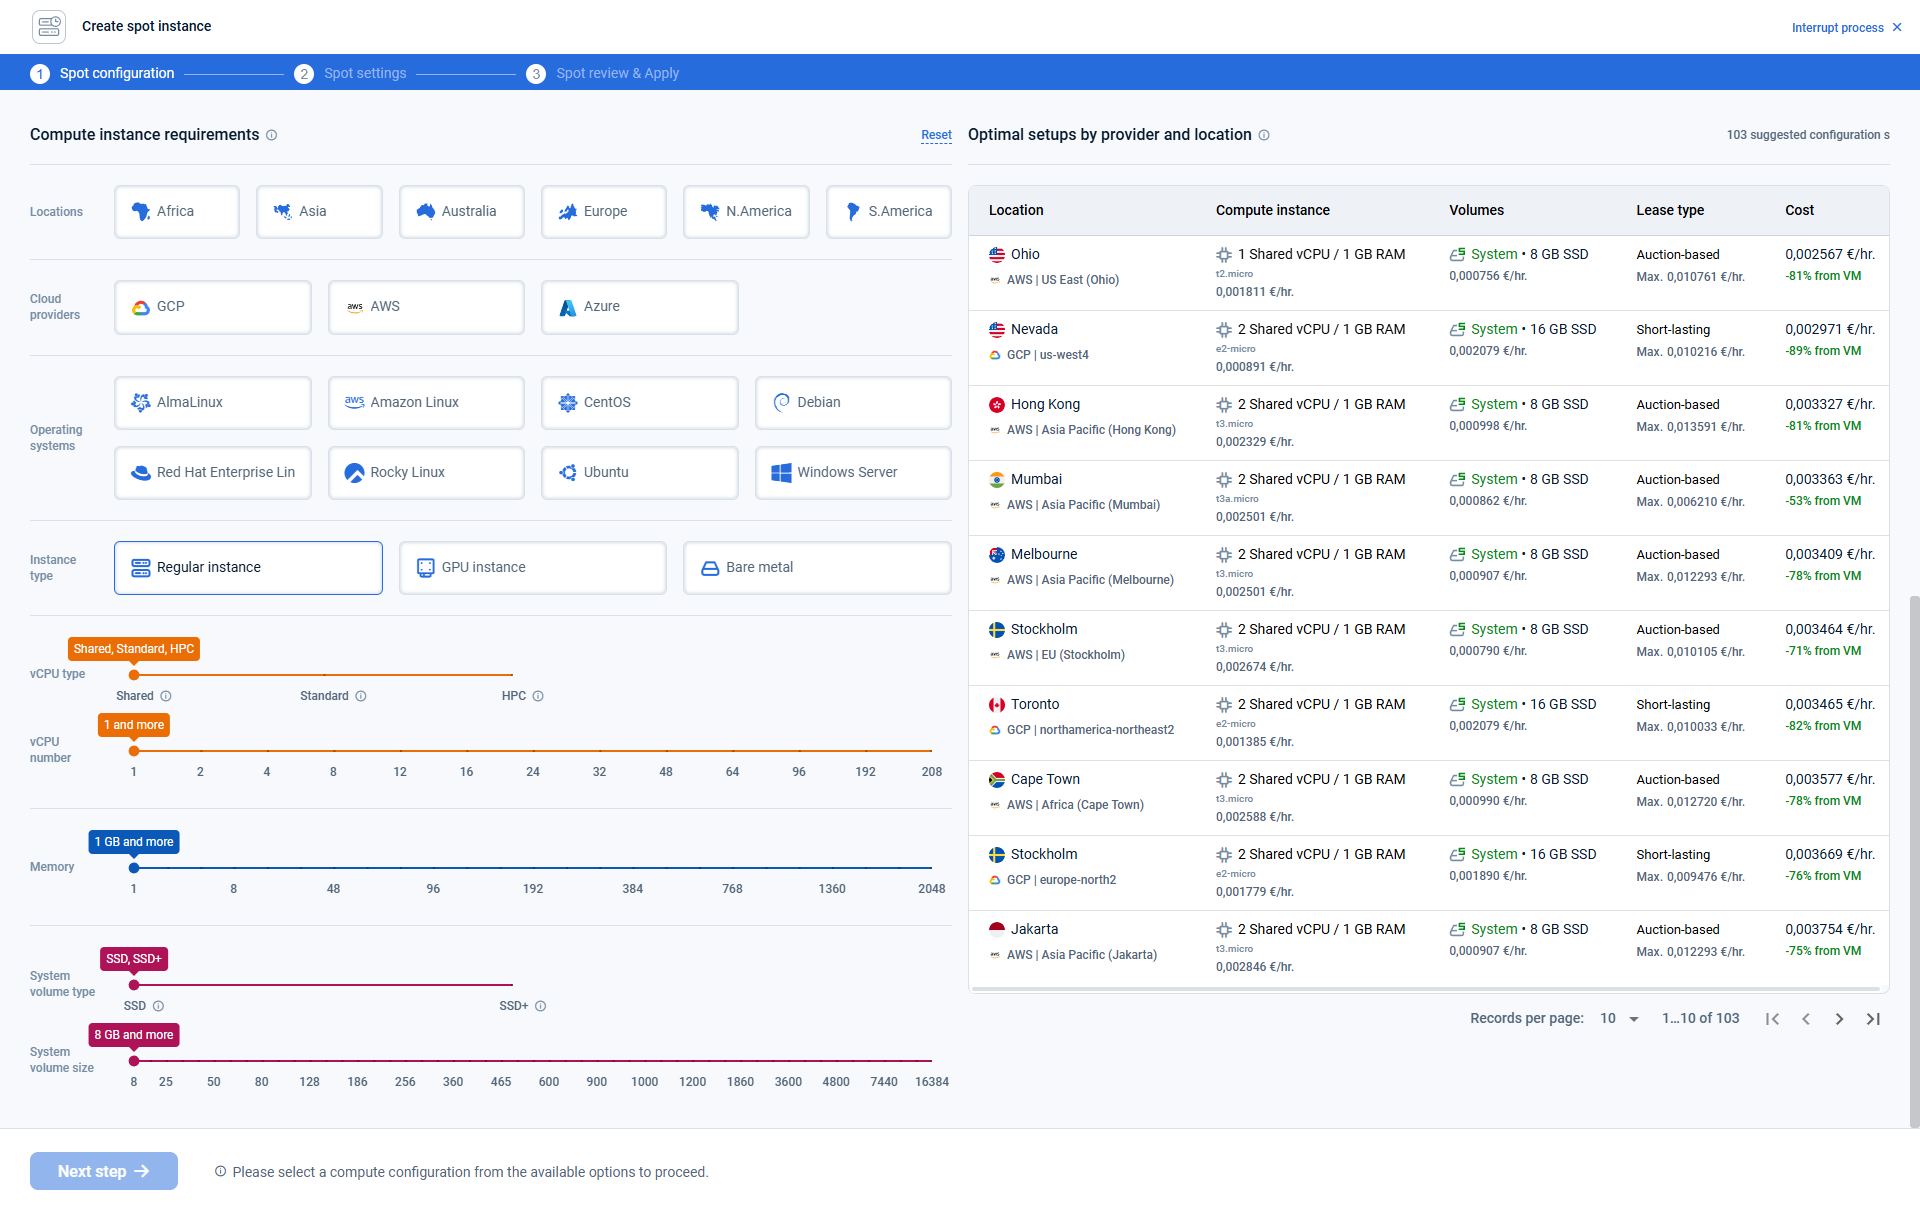
Left panel: Filters
The left panel allows you to filter the compute instance configurations by selecting the following parameters.
Location
Select the geographic location where the Spot instance will be deployed. Choosing a location closer to your users can reduce latency and improve performance. Only configurations available in the selected locations will be shown.
Cloud provider
Select the cloud provider that will host the Spot instance. Only one (the cheapest) configuration from the selected provider in a single location will be shown.
Operating system
Filter the Spot instance configurations by the operating systems that are supported for installation. You will select the exact operating system in the next step.
Instance type
Select the type of compute instance:
- Regular instance — General-purpose workloads
- GPU instance — GPU-accelerated workloads
- Bare metal — Dedicated physical servers without virtualization
GPU type
Select NVIDIA or AMD GPU types to filter configurations.
GPUs
Select the number of GPUs in the Spot instance.
vCPU type
Specify the type of virtual CPU:
- Shared — Cost-effective option with shared CPU resources. Shared CPU means your virtual machine runs on a physical host where CPU resources are shared among multiple virtual machines. The hypervisor schedules CPU time across tenants, so performance can vary depending on host utilization. This option is best suited for cost-effective workloads that don’t require consistently dedicated CPU performance, such as small web applications, lightweight services, development, and testing environments.
- Standard — Balanced performance. Standard CPU configuration means that the virtual machine you create is running on a physical host machine that has dedicated CPU resources allocated exclusively to your VM. With a standard CPU configuration, you can expect consistent and predictable CPU performance. This option is best suited for workloads that require a dedicated CPU, such as larger web applications, databases, and enterprise applications.
- HPC — High-performance computing workloads. HPC (High Performance Computing) CPU configuration means that the virtual machine you create is running on a physical host machine that has high-frequency CPUs optimized for high-performance computing. This option is best suited for compute-intensive workloads that require a lot of CPU power, such as scientific simulations, financial modelling, and video encoding. HPC CPUs can provide significantly higher performance compared to standard CPUs, but they may also come at a higher cost.
vCPU number
Use the slider to select the required number of virtual CPU cores.
Memory
Use the slider to define the amount of RAM for the instance (in GB).
System volume type
Select the storage type for the system disk:
- SSD
SSD (Solid State Drive) is a type of storage volume that uses flash memory to store data. SSDs provide faster read and write speeds compared to HDDs, making them ideal for workloads that require fast I/O performance, such as web servers or database servers. However, SSDs typically have a higher cost per gigabyte than HDDs.
- SSD+
SSD+ (Solid State Drive Plus) is a type of storage volume that uses SSD technology optimized for high IOPS performance. This option is best suited for workloads that require both fast I/O performance and high throughput, such as content delivery networks or media streaming services. SSD+ provides significantly higher performance than standard SSDs, at a higher cost per gigabyte.
System volume size
Specify the size of the system disk in gigabytes.
Right panel: Available configurations
The right panel displays a list of recommended configurations that match the selected filters.
The displayed results present the most cost-effective configurations from each selected provider for each location. This streamlined approach simplifies decision-making by removing less competitive pricing options, with the list arranged by cost.
To explore higher-tier options within a specific location, adjust the filtering parameters such as vCPU type, vCPU count, memory, system volume type, and system volume size to match your requirements.
For each configuration, the following information is shown:
- Location and data center
- Compute instance specifications (vCPU and RAM)
- System volume type and size
- GPU type and number of GPUs (for GPU configurations only)
- Local volumes. Local volume provides high-performance SSD storage that is directly attached to the host machine. Data stored on a local volume is ephemeral and will be permanently lost when the virtual machine is stopped or deleted.
- Estimated monthly cost
Use this list to compare options and select the configuration that best fits your requirements.
After selecting a suitable configuration, click Next step to continue to the next stage of the Spot instance creation process.
Step 2. Settings
In this step, you configure the network, security, operating system, and authentication settings for the Spot instance.
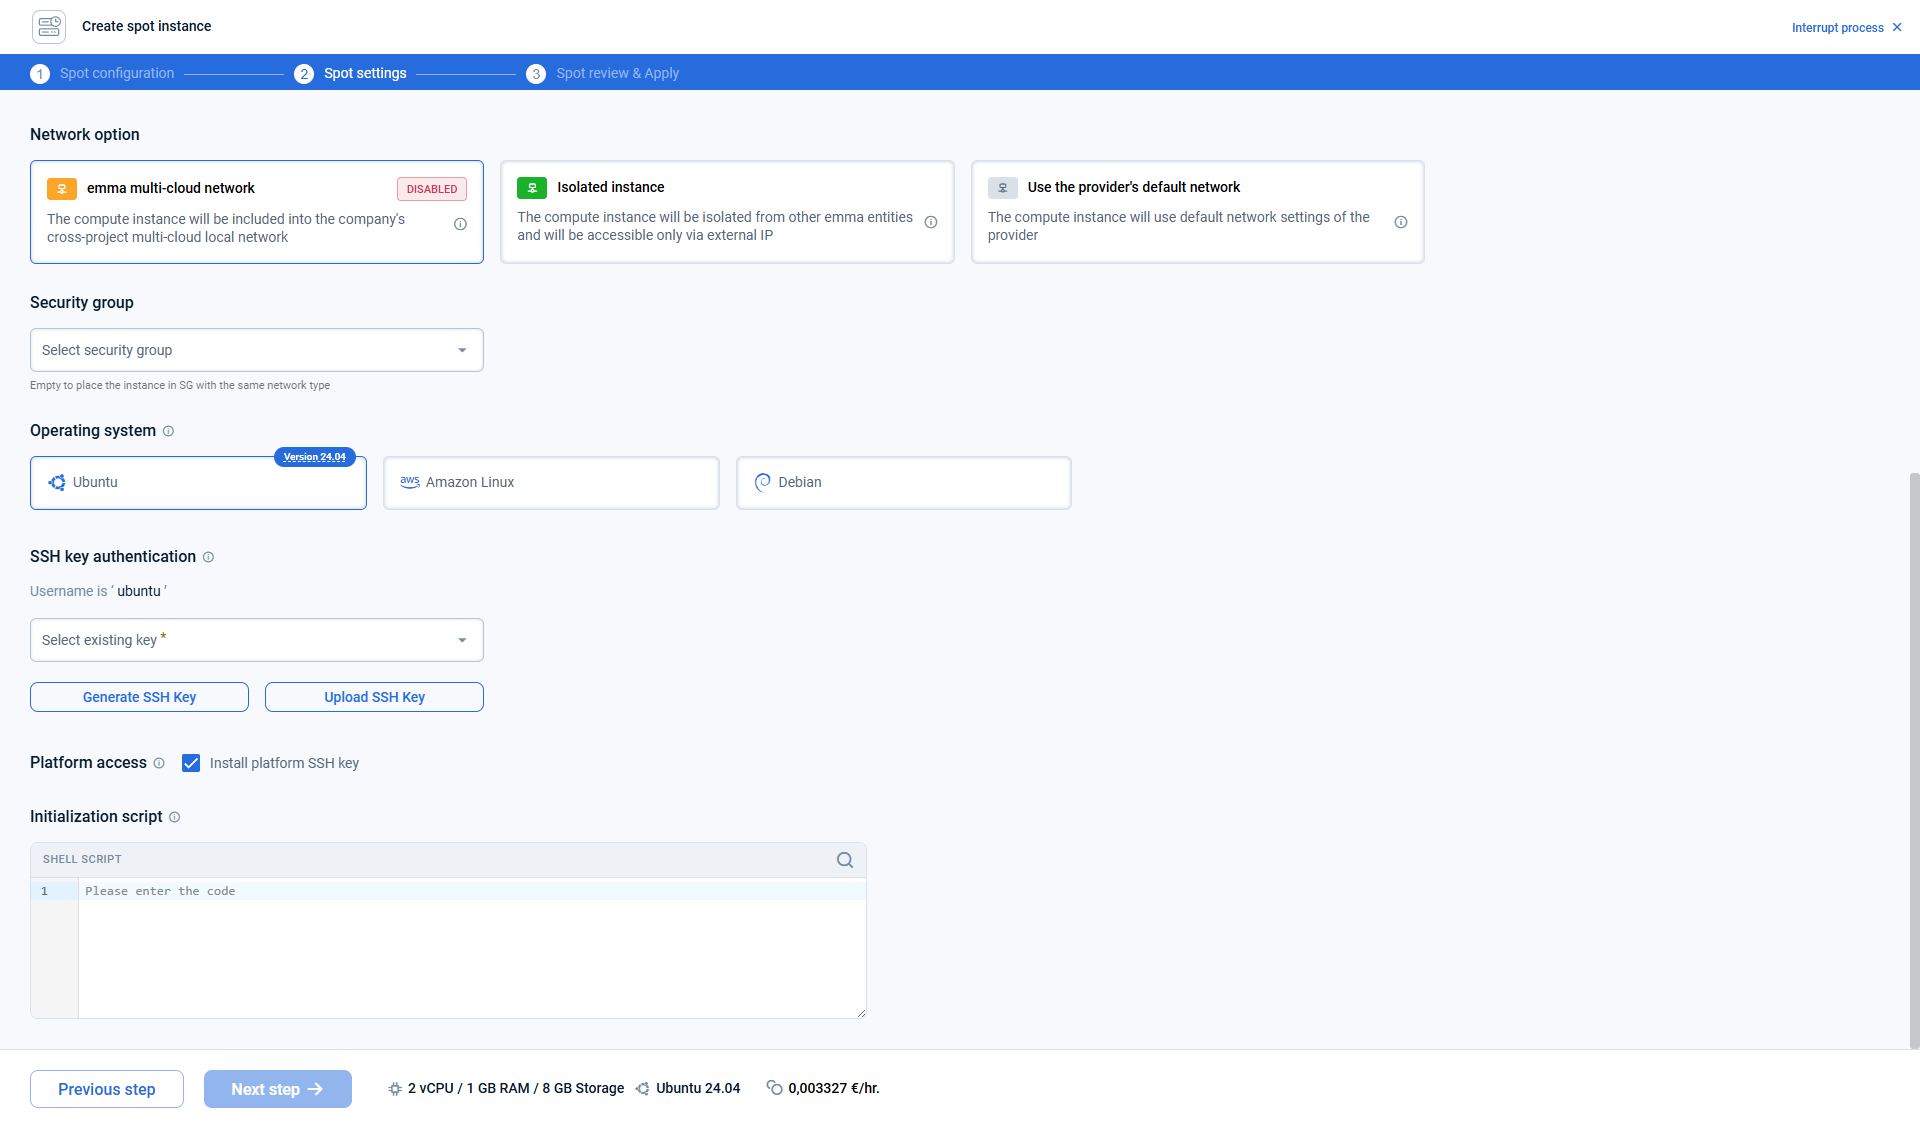
Network option
Select how the virtual machine will be connected to the network:
- emma multi-cloud network Creates the compute instance in the company’s multi-cloud local network, allowing private connectivity between resources. (To turn on connectivity, you need to enable Direct Connect in your project.)
- Isolated instance The compute instance is isolated from other emma entities and is accessible only via a public (external) IP address.
- Use the provider’s default network The compute instance uses the cloud provider’s default network settings.
Security group
Select an existing security group to control inbound and outbound traffic for the instance. If no security group is selected, the instance will be placed into a default security group that matches the chosen network type.
Operating system
Select the operating system to be installed on the Spot instance. OS images with GPU drivers installed are available for the GPU instances.
SSH key authentication
Configure SSH access to the Spot instance:
- Select an existing SSH key from the list
- Or generate a new SSH key
- Or upload an existing SSH key
The default SSH username depends on the selected operating system (for example, ubuntu for Ubuntu).
After completing the required settings, click Next step to proceed to the final review and confirmation stage.
Platform access
Allows SSH access to the compute instance via the platform terminal. The Platform SSH key is installed.
Initialization script
An optional bash script executed after the compute instance is created via cloud-init.
Step 3. Review and Apply
In the Review & Apply step, you review the selected Spot instance configuration, adjust the number of instances if needed, rename if needed, and start the deployment process.
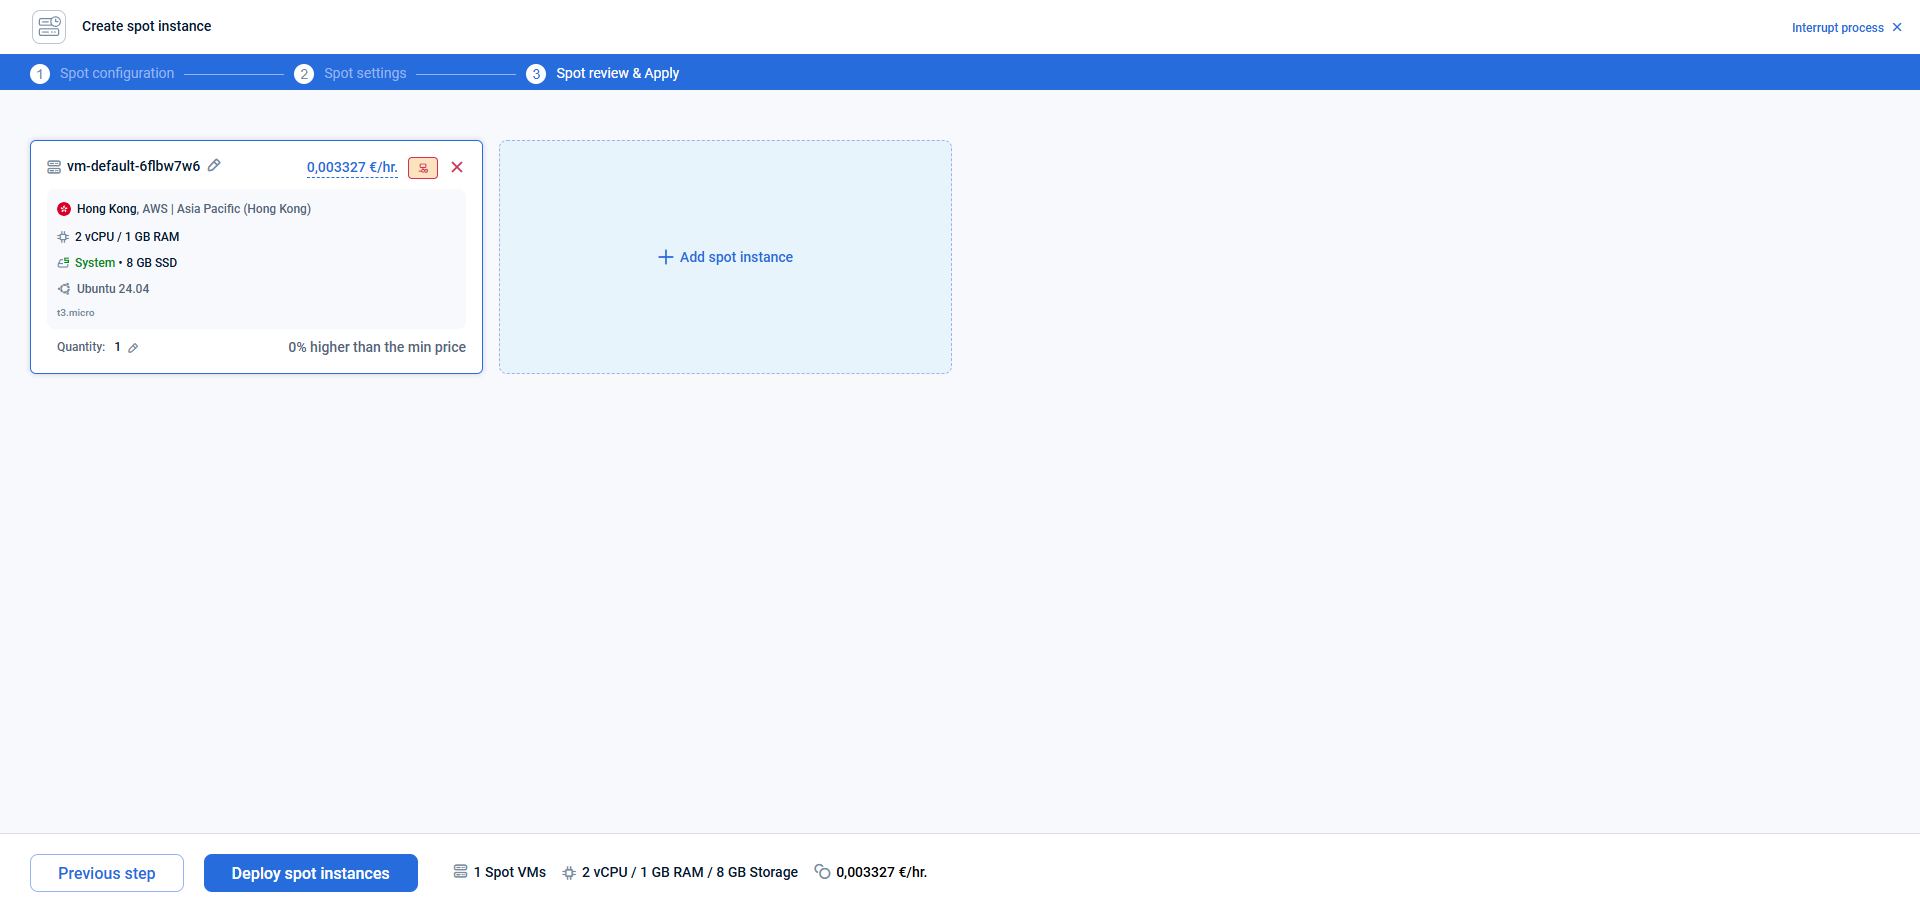
Selected Spot instances
This section displays a summary card for each Spot instance to be created. For each Spot instance, the following details are shown:
- Spot instance name
- Cloud provider and location
- Compute resources (vCPU and RAM)
- GPU configuration (if applicable)
- System volume type and size
- Local or additional storage (if configured)
- Operating system
- Estimated monthly cost (with percentage above the minimum price)
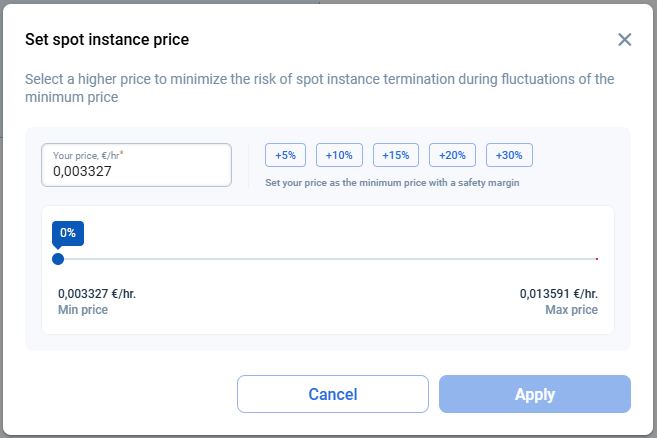
Set spot instance price
By clicking the monthly cost, you can open the "Set spot instance price" form. Select a higher price to minimize the risk of spot instance termination during fluctuations of the minimum price
Edit name or remove a Spot instance
- Click the edit (pencil) icon next to the Spot instance name to edit the name.
- Click the remove (×) icon to delete the Spot instance from the deployment list.
Quantity
- You can adjust the quantity to deploy multiple identical Spot instances with the same configuration. Use the edit (pencil) icon at the bottom of the card.
Add Spot instance
Click Add spot instance to include additional instances in the same deployment. Each spot instance can have its own configuration.
Deployment summary
At the bottom of the page, a summary displays:
- Total number of Spot instances
- Aggregate compute and storage resources
- Total estimated monthly cost
Deploy
After reviewing all settings, click Deploy to start provisioning the Spot instance(s). Use the Previous step to return and make changes before deployment.
Last updated on 1 Aug 2026