
VM details General Info
Overview
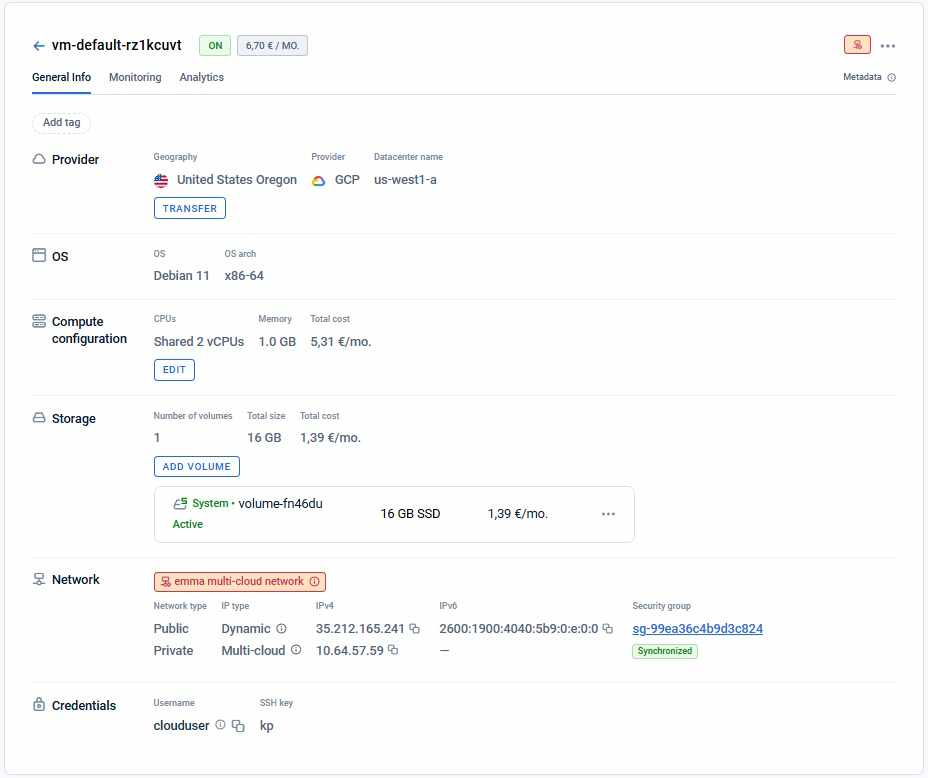
This page provides information about the virtual machine like tags, advice, provider, OS, hardware, storage, network, and details including security group and IP addresses.
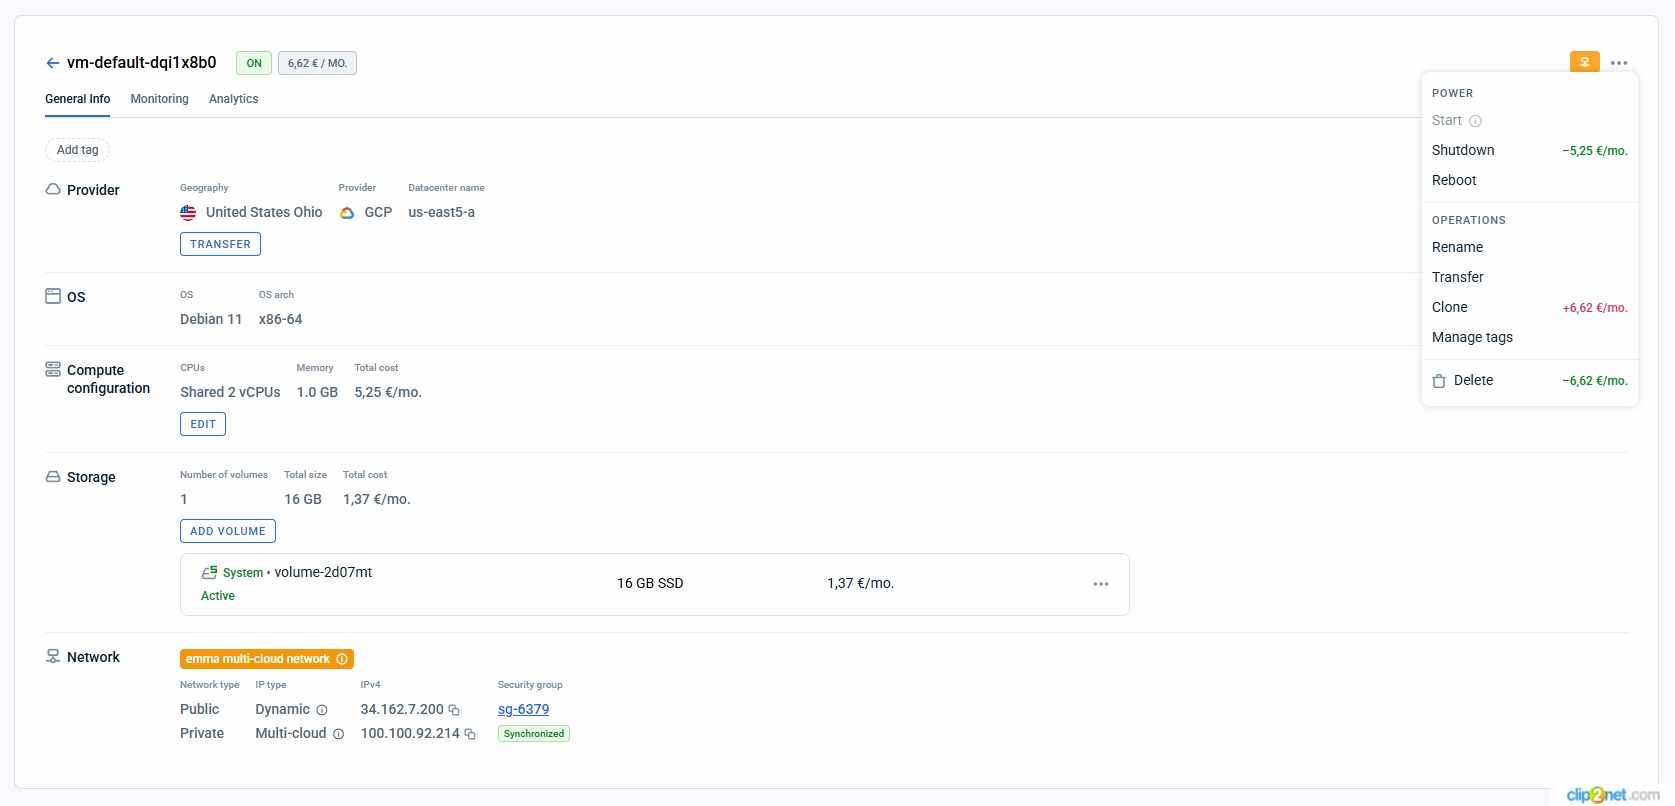
The user also has access to the Virtual machine settings, which include power settings, operations settings, and actions that can be performed.
Information on this page
This page gives all the detailed information about the Virtual machine. It tells you about the following categories of Virtual machine attributes.
- Tags - Tells you about all tags that are assigned to Virtual machines (if there are any). Tag is a metadata attribute that consists of a key-value pair and that can be assigned to the Virtual machine.
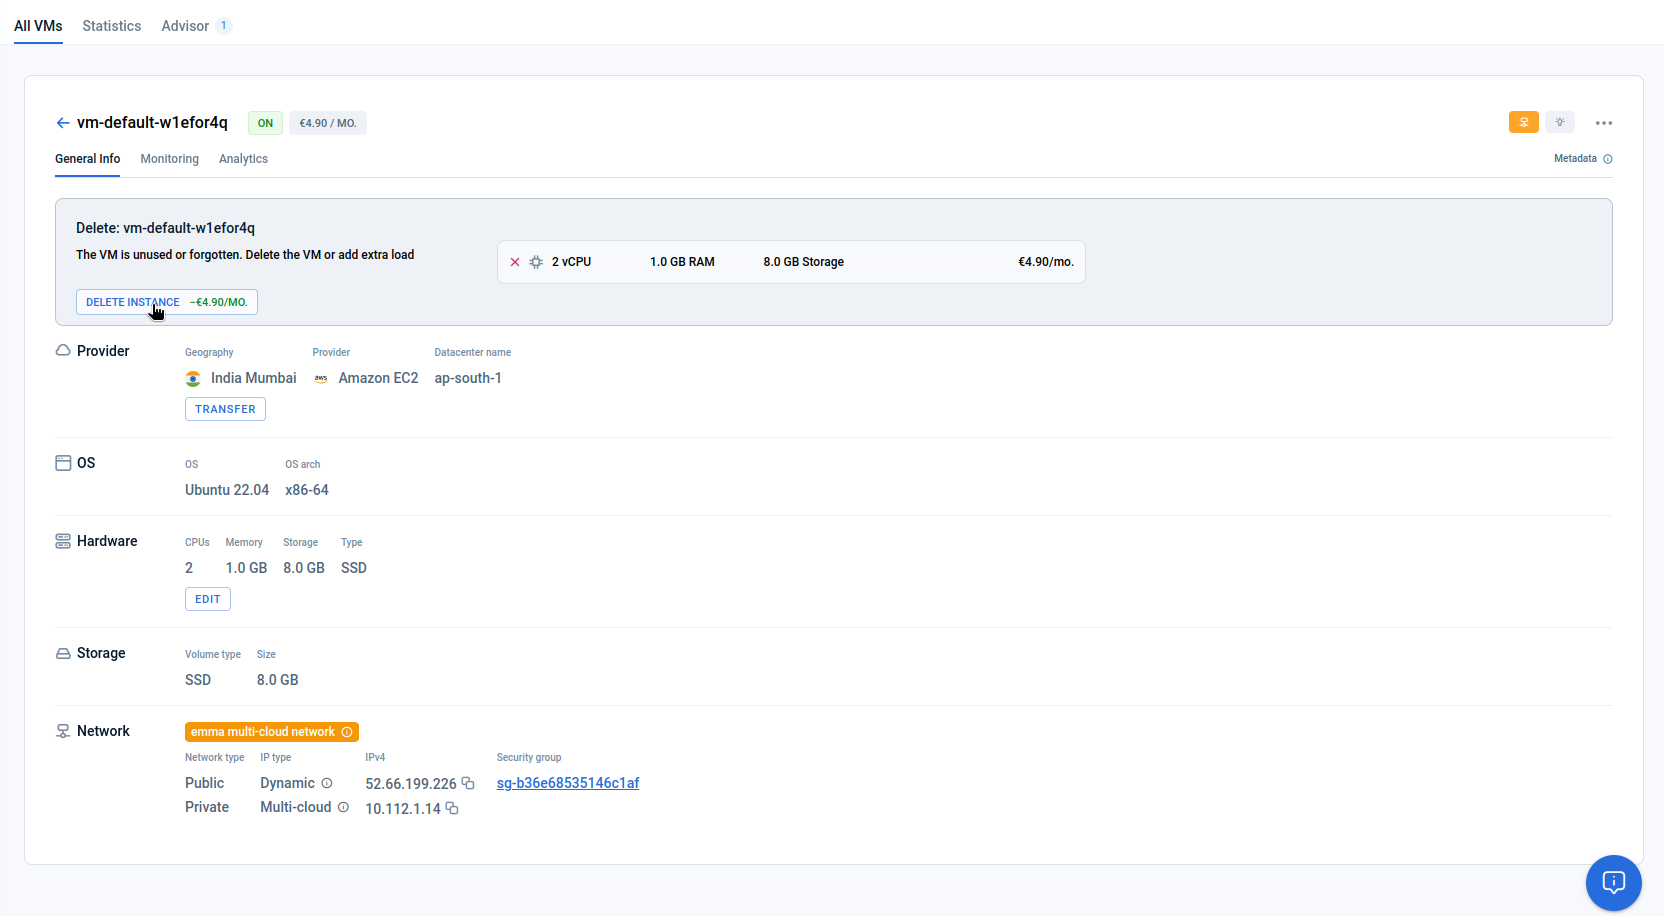
- Advice - Tells you about actions recommended to the Virtual machine to optimize (if there are any)
- Provider - Tells you about the provider name, server geographical location, and provider data center name
- OS - Tells you about the Operating System like “Ubuntu” and OS architecture like “x86-64”
- Compute configuration - Tells you about the number of virtual CPU cores, memory (vRAM). You can upgrade or downgrade your virtual machine configuration if you click “Edit”.
- GPU - GPU type and total GPU memory in GB (for GPU virtual machines only).
- Storage - Tells you about the types and sizes of the volumes. You can add a new or existing volume, edit an existing one or detach it, and delete a volume Local volume - provides high-performance SSD storage that is directly attached to the host machine. Data stored on a local volume is ephemeral and will be permanently lost when the virtual machine is stopped or deleted.
- Network - IPv4 public and private addresses, IPv6 public address. It also provides the name of the security group and tells if the security group is synchronized with the provider’s network inbound and outbound rules. The hyperlink of the security group will launch the page that shows the security group’s outbound and inbound network rules.
- Workflow Execution - block appears for virtual machines that were created with a workflow. This block provides the following information:
- Workflow name — The name of the workflow that was executed after VM creation If the workflow still exists, the name is a clickable link that navigates to the workflow detail page If the workflow has been deleted, only the name is displayed (no link)
- Execution Status — The current status of the workflow execution, updated in real time:
- Pending — The instance has been created and is waiting for the VM to be provisioned
- Running — The workflow script is currently executing on the VM
- Success — The script has completed successfully
- Failed — The script execution has failed
Actions you can perform on this page
Actions you can perform on a virtual machine via buttons
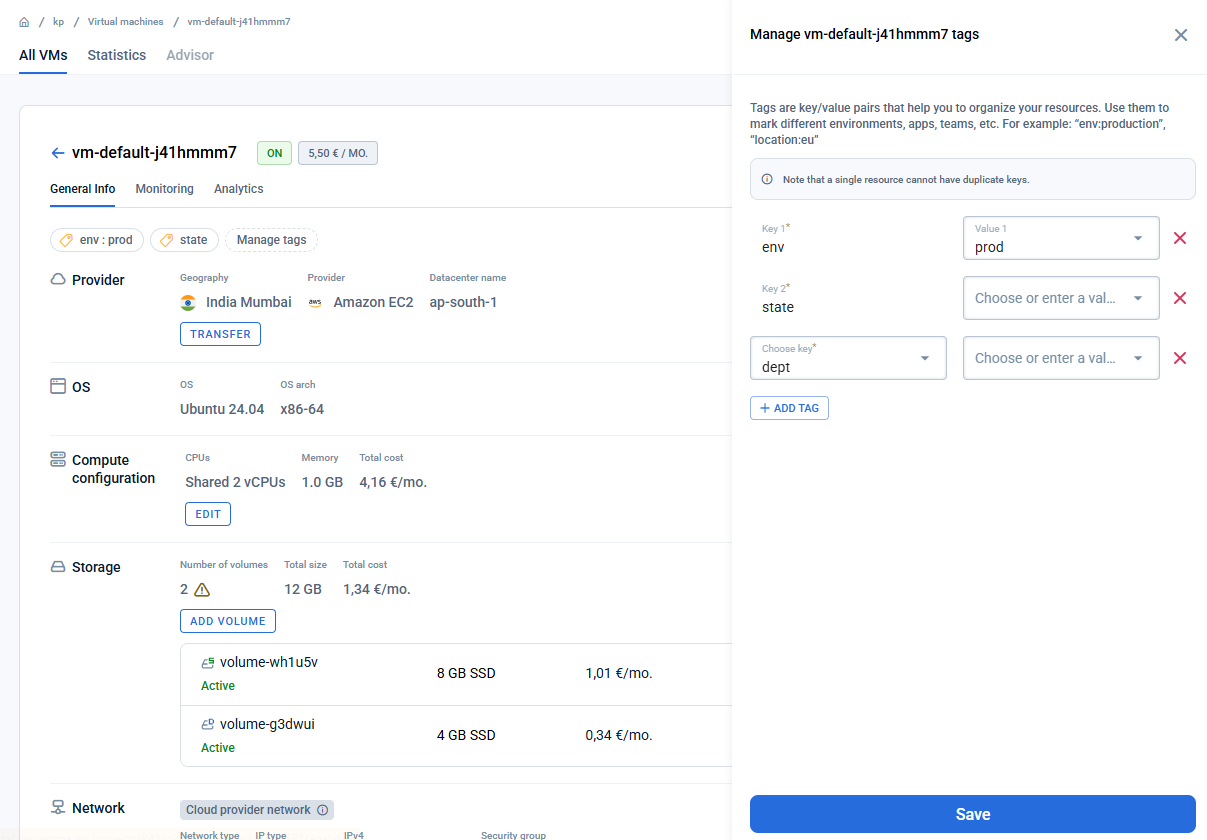
- Create tags: Create tags: The “Manage Tags” or "Add tag" buttons open the “Manage tags” side page. You can create as many tags as needed by inputting “key: value” pairs. When the tag is assigned it appears on the list
- Apply recommendations: The actions that you can perform depend on the advice provided by the emma platform (for example - Delete, Resize, Increase load, Decrease load, Adjust load)
- Transfer to another location: The “Transfer” button opens a side page with the list of available locations
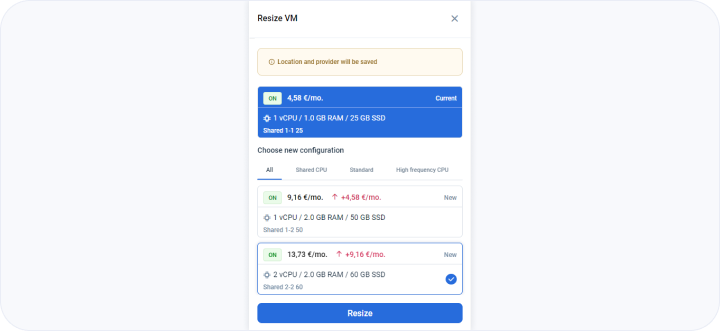
- Edit the compute configuration: The “Edit” button in the “Compute configuration” block opens a sidepage with the list of available instance configurations
Actions you can perform on a virtual machine using the "Ellipsis" menu
- Start: You can activate the Virtual machine with the status OFF.
- Shutdown: You can shut down the Virtual machine with the status ON.
- Reboot: You can reboot a Virtual machine with statuses ON and OFF. After the reboot, the instance will have an ON status.
- Rename: Allows changing the name of the virtual machine. Applicable in all statuses except "FAILED".
- Clone: You can clone your Virtual machine to a new one with the same configuration and OS as the current one exactly. Your data is also cloned over exactly like the source Virtual machine. After cloning, mounting data volumes may be required.
- Manage tags: You can add, edit, or remove tags via the side page.
- Delete: You can delete the Virtual machine regardless of its status.
Actions you can perform on volumes
- Add a volume: To add extra storage, use the “Add Volume” button in the “Storage” section. This opens a sidepage where you can select and customize the configuration of a new volume or choose an existing one to suit your needs
- Detach a volume: To detach a volume from a virtual machine, open the context menu for the desired volume and select “Detach”.
- Edit a volume: You can increase the size of an existing attached volume by clicking on the “Edit” button in the “Storage” block and adjusting the size as required.
- Delete a volume: To remove a volume, open its context menu and select the Delete option.
How do I create tags for virtual machines? - FAQ
You can easily create any count of tags for a virtual machine. With tags, users will be able to manage and organize their resources. Tags are common for the entire company and are available for all users and can contain any information that can be useful.
How to create a tag:
- Open the Virtual machine “General Info” page
- You have two ways to create a tag: via the menu or by clicking on the “Manage Tags” button
- On the opened side page, you can choose key/value names from the dropdown list or enter a new one
- After saving created tags will appear on the Virtual machine's “General Info” page
Notice. You can have up to 63 tags with different keys. Every key can have only one value for one instance. But in the Company you can have one key with many values.
During the initial creation phase of a VM, tag management will be unavailable. Please wait a short while for this feature to be unlocked.
How do I manage tags for virtual machines? - FAQ
You can easily manage tags for a virtual machine. With tags, users will be able to manage and organize their resources. Tags are common for the entire company and are available for all users and can contain any information that can be useful. Keys are not editable, but you can change values for all chosen VMs at a time if all chosen instances have the same key-value pair, or if chosen instances have different values for the same key or if some instances don’t have such key.
How to manage the tag:
- Open the Virtual machine “General Info” page
- You can manage the tag via the menu
- On the opened side page you can create new tags, remove tags, change values
- After saving updated tags will appear on the Virtual machine's “General Info” page
How do I apply recommendations for virtual machines? - FAQ
You can easily provide actions with a virtual machine. The actions that you can perform depend on the advice provided by the emma platform (for example - Delete, Resize, Increase load, Decrease load, Adjust load)
How to apply:
- Open the Virtual machine “General Info” page
- Click the action button on the advice tile
- Wait until the process is finished
How do I move a virtual machine to another location? - FAQ
You can easily move a virtual machine to another location with our Transfer feature. It allows you to create a new virtual machine that is an exact clone of the original compute instance, including the same configuration, provider, and operating system, but in a different geographical location.
Important Points to Consider:
- Only users with "Manage" level access in Infrastructure Actions have the authority to initiate compute instance transfers.
- Transfers can be performed exclusively on virtual machines that are in either the "ON" or "OFF" state. Instances in other states are not eligible for moving.
- The moving process involves powering off and restarting the original compute instance.
- If the original virtual machine has a dynamic public IP address, it may be changed after moving to another location.
- All volumes attached to the original virtual machine will be automatically transferred to the new virtual machine during the migration process, but mounting data volumes may be required
- Please be aware that both public and private IP addresses on the new virtual machine will be different from the original instance. Additionally, any existing snapshots and attached reserved IPs will be lost on the new machine.
How to move the virtual machine to another location:
- Click on "Transfer" within the user interface to begin the moving process.
- On the opened side page, choose the desired geographical location and configuration for the new virtual machine. The side page will display the cost difference considering the new virtual machine.
- After selecting the configuration, click 'Next' to proceed to the virtual machine setup. Here, you can choose a network and decide whether to keep the original compute instance or remove it
- Once you have configured the new virtual machine settings, click on "Transfer" to initiate the process.
- During the transfer process, the service will power off and restart the original instance. Once the transfer is complete, you will receive a notification via a toast. Alternatively, you can find the new instance listed on the "All virtual machines" page.
- Mount data volumes, if needed, using the instruction Format and mount a volume
If you have any further questions or require assistance, please do not hesitate to reach out to our support team.
Can I move my virtual machine to another provider? - FAQ
Currently, the feature to transfer a compute instance to a virtual machine from another provider is not available. However, our team is actively working on implementing this functionality. Stay tuned for updates on this feature, and we appreciate your understanding and patience during this process.
How do I edit the compute configuration of my virtual machine? - FAQ
The compute configuration section tells you about the count of virtual CPU cores, memory (vRAM) and total cost of the configuration. You can upgrade or downgrade your virtual machine configuration if you click on the “Edit” button. Upon clicking “Edit” you will see a sidepage open up on the right. You can choose a suitable configuration. The types of configurations that are available are “Shared CPU, Standard and High-Frequency CPU”.
Note: Compute configuration changes on DigitalOcean virtual machines are linked to system disk resizing
How do I add a volume to my virtual machine? - FAQ
A volume is a persistent block storage resource that can be attached to virtual machines to provide additional storage. Volumes can be used for expanding storage when the system volume is insufficient.
To add a volume to a virtual machine:
- Navigate to the virtual machine's details page where you want to attach a volume.
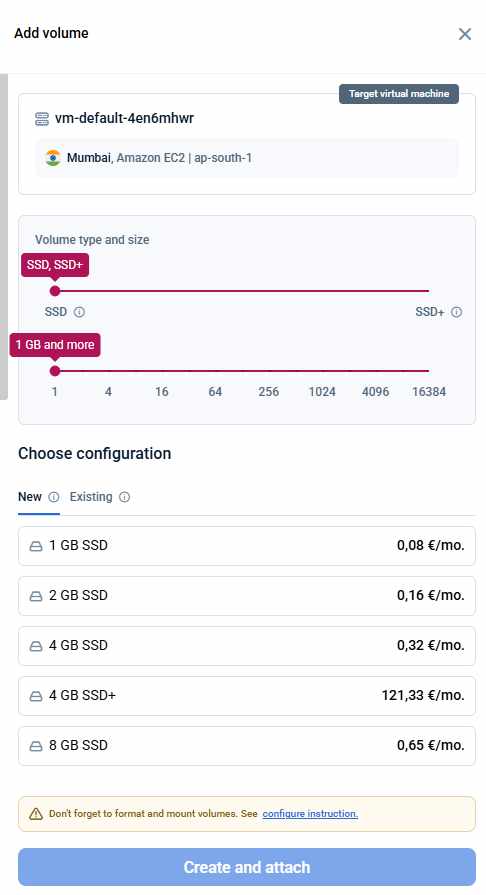
- Click the “Add Volume” button in the Storage section.
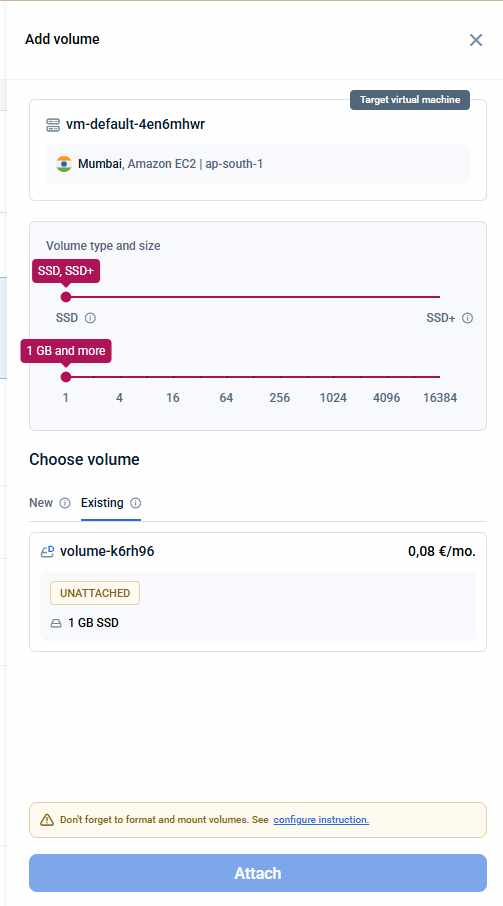
- In the sidepage, choose how you want to proceed:
- To create and attach a new volume: Stay on the “New” tab, select a preferrable configuration, and click “Create and Attach”
- To attach an existing volume: Switch to the “Existing” tab, select the desired volume, and click “Attach” to finalize the process. If the chosen volume is already connected to another instance, the platform will notify you to detach it beforehand. Confirm by clicking the “Detach” button in the modal window. The volume will be released from its current instance and connected to the desired instance.
The new volume will appear in the Storage table once the process is started.
Important Points to Consider:
- Only users with “Manage” access in Infrastructure Actions can create volumes.
- Only users with “Operate” and higher access in Infrastructure Actions can attach volumes.
- You can attach a volume only if it is located in the same data center and belongs to the same provider as the instance.
- Volumes must be attached to a virtual machine and cannot exist independently.
- A volume can have the following statuses:
- DRAFT - The volume is being created
- BUSY - The volume is being prepared
- AVAILABLE - This volume is prepared for use but is not currently attached to any instance
- ACTIVE - The volume is attached to an instance and fully operational
- FAILED - Something went wrong. Please try again or contact our tech support team for assistance
- DELETED - Volume was deleted
- When a new volume is added to a virtual machine, it needs to be formatted and mounted to make it usable by the operating system. Refer to the instruction for detailed guidance on completing this process.
- Cloud providers impose limits on the number of attached volumes and total storage size per instance. If adding a volume exceeds these limits, emma will prevent the action and display the following message: “The action will exceed the provider's resource limits for the number of volumes or total volume size for one instance“.
- Providers limits:
- AWS: Supports 27–28 volumes per instance.
- GCP:
- Maximum attached volumes:
- 128 volumes for Standard and HPC instances
- 16 volumes for Shared compute instances
- Maximum total attached storage:
- 257 TB for Standard and HPC instances
- 3 TB for Shared compute instances
- Maximum attached volumes:
- Azure: Limits depend on the instance's vCPU count:
- 1 vCPU → 2 volumes
- 2 vCPUs → 4 volumes
- 4 vCPUs → 8 volumes
- 8–12 vCPUs → 16 volumes
- 16+ vCPUs → 32 volumes
- DigitalOcean: Allows up to 15 volumes per virtual machine.
- Providers limits:
How do I edit the volume? - FAQ
- Navigate to the virtual machine's details page where you want to edit a volume.
- Click the “Edit” button in the Storage section.
- Select your preferred volume configuration from the available options.
- Click “Edit” to finalize your choice.
The editing process will start.
Important Notes
- Volume size can only be increased. Decreasing the size of a volume is not supported.
- Volumes cannot be edited when virtual machine is not in “ON” or “OFF” state
- Volumes cannot be edited when volume is not in “Active” or “Available” state
- After resizing a volume, the additional storage capacity may not immediately be usable by the operating system. To fully utilize the expanded volume, you must manually resize the file system. Refer to the article to find the instructions.
How do I detach the volume from a virtual machine? - FAQ
- Navigate to the Details page of the virtual machine where the volume is attached.
- In the Storage section, locate the volume you want to detach.
- Open the context menu for the volume and select “Detach” from the dropdown.
- Confirm by clicking the “Detach” button to start the process.
The volume detaching process will start.
Important Points to Consider:
- Only data volumes can be detached. The system volume of a virtual machine cannot be removed.
- Only users with “Operate” and higher access in Infrastructure Actions can detach volumes.
- Volumes cannot be detach when virtual machine is not in “ON” or “OFF” state.
- Volumes cannot be detach when volume is not in “Active” state.
How do I delete the volume? - FAQ
- Go to the page of the virtual machine the volume is attached to.
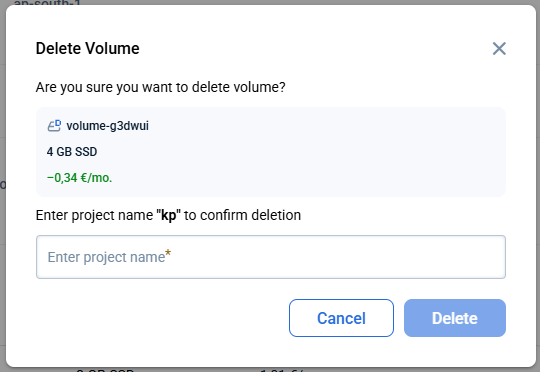
- Locate the volume you wish to delete in the Storage section and click on the context menu icon.
- Select the “Delete” option from the dropdown menu.
- Confirm Deletion by entering the project name and click on the “Delete” button to initiate the process.
The volume deletion process will start.
Important Notes:
- Only users with “Manage” rights in the project can delete volumes.
- Deleting a volume is permanent. The volume cannot be recovered, and all data will be permanently lost.
- Only data volumes can be deleted. The system volume of a virtual machine cannot be removed.
VM ellipsis options - VM ellipsis dropdown menu options
Last updated on 1 Aug 2026